Well yes you can, because you can undo.Joanna Carter wrote:And this is where you get your noise from. Adjusting the original layer is "destructive", which means that you can't readjust what you've already done without doing more "damage".Patrick Dixon wrote:I don't bother using layers in gimp, I just apply the curve to the image and save it as a new file.
B&W processing and scanning help sought.
-
Patrick Dixon
- Forum Hero
- Posts: 252
- Joined: Thu Apr 09, 2009 4:20 pm Etc/GMT-1+01:00
- Location: Yate
-
Joanna Carter
- Founder
- Posts: 1283
- Joined: Wed Mar 29, 2006 7:26 pm Etc/GMT-1+01:00
- Workshop Images: http://grandes-images.com/fr/Paysages/P ... _2009.html
- Location: Plestin-les-Grèves, France
- Contact:
Re: B&W Processing and scanning help sought
This is certainly one way of getting the image into the computer but I would expect that the scan will only then be as good as the contact print and this cannot be as good as a straight scan because the neg has more brightness range than printing paper can cope with, without dodging and/or burning.vanman wrote:With a scanner that won't take a 4x5 neg would Patrick be better off making a contact print and scanning that if he needs a digital image? I've done this in the recent past and the results were pretty good as far as I could see?
It all depends on how good you want your final prints to look. All the B&W images on my site were taken on Acros but none of them would have looked as good as they do without having to have applied several adjustments to the scanned image; just as I would expect to do when wet printing. Likewise, I would not expect to get an adequate wet print, contact or otherwise, without some serious effort, even though the negs might look superb.
Despite Ansel Adams ideas that, with the zone system, you should be able to obtain the optimum negative to print, I gather he still did some considerable work to get some prints just as he wanted them. Somehow I doubt he woould have been able to achieve his results from a contact print
Reassure yourself - stroke an Ebony
-
Joanna Carter
- Founder
- Posts: 1283
- Joined: Wed Mar 29, 2006 7:26 pm Etc/GMT-1+01:00
- Workshop Images: http://grandes-images.com/fr/Paysages/P ... _2009.html
- Location: Plestin-les-Grèves, France
- Contact:
-
Patrick Dixon
- Forum Hero
- Posts: 252
- Joined: Thu Apr 09, 2009 4:20 pm Etc/GMT-1+01:00
- Location: Yate
-
Joanna Carter
- Founder
- Posts: 1283
- Joined: Wed Mar 29, 2006 7:26 pm Etc/GMT-1+01:00
- Workshop Images: http://grandes-images.com/fr/Paysages/P ... _2009.html
- Location: Plestin-les-Grèves, France
- Contact:
Agreed but my point is that also means undoing every adjustment, just to get back to the one that needed correcting, then having to remember how to redo all those subsequent adjustments that followed the corrected one.Patrick Dixon wrote:You can undo back as far as I've ever tried.
Reassure yourself - stroke an Ebony
-
Patrick Dixon
- Forum Hero
- Posts: 252
- Joined: Thu Apr 09, 2009 4:20 pm Etc/GMT-1+01:00
- Location: Yate
I have scanned flat using colour transparency settings and converted to mono in gimp. I've then applied a truly horrible looking curve to get this:

so I shall put it in the post and see what someone who knows what they're doing can make of it! Thanks Joanna.
(I'm sure the 4490 is a limitation, and I'll move up to a 700/750 at some point, but I am overspent on my limited budget at the moment.)
so I shall put it in the post and see what someone who knows what they're doing can make of it! Thanks Joanna.
(I'm sure the 4490 is a limitation, and I'll move up to a 700/750 at some point, but I am overspent on my limited budget at the moment.)
-
Alan Clark
- Posts: 53
- Joined: Sat Mar 28, 2009 12:00 pm Etc/GMT-1+01:00
- Location: North Yorkshire
Joanna,
Two things puzzle me about your first reply to Patrick.
1. You say you take a reading from the darkest area where you want to retain shadow detail, then give an exposure that is 4 stops less than this reading. Surely this would result in the film being 2 stops underexposed. The reason? Well, you gave it yourself. You said this places this dark shadow area on Zone 1. But Zone 1 is black; the area you metered from is actually Zone 3.
2. Why do you want to produce a negative for scanning that is so contrasty that it won't print in the darkroom? I have always found that negatives which scan best are , if anything, a bit flat for easy darkroom printing.
You say you meter the highlights to see they don't go more than 5 stops above your exposure. But with your exposure 2 stops down from what it should be at Zone 3, these highlights will actually only be on Zone 8. Normal development would produce a negative that should easily print in the darkroom, so you must really be giving it a lot of development to push the contrast up as high as you say.. I am sure you will have a reason for doing this, and am keen to know it.
Sorry to sound critical, especially as I am a new boy here...
Alan Clark
-
Joanna Carter
- Founder
- Posts: 1283
- Joined: Wed Mar 29, 2006 7:26 pm Etc/GMT-1+01:00
- Workshop Images: http://grandes-images.com/fr/Paysages/P ... _2009.html
- Location: Plestin-les-Grèves, France
- Contact:
Hi AlanAlan Clark wrote:Two things puzzle me about your first reply to Patrick.
1. You say you take a reading from the darkest area where you want to retain shadow detail, then give an exposure that is 4 stops less than this reading. Surely this would result in the film being 2 stops underexposed. The reason? Well, you gave it yourself. You said this places this dark shadow area on Zone 1. But Zone 1 is black; the area you metered from is actually Zone 3.
2. Why do you want to produce a negative for scanning that is so contrasty that it won't print in the darkroom? I have always found that negatives which scan best are , if anything, a bit flat for easy darkroom printing.
You say you meter the highlights to see they don't go more than 5 stops above your exposure. But with your exposure 2 stops down from what it should be at Zone 3, these highlights will actually only be on Zone 8. Normal development would produce a negative that should easily print in the darkroom, so you must really be giving it a lot of development to push the contrast up as high as you say.. I am sure you will have a reason for doing this, and am keen to know it.
Sorry to sound critical, especially as I am a new boy here...
My reason for using these, apparently wrong, zones is because I have determined, by experimentation, that it is perfectly possible to produce a negative using Zone 1 for shadow detail and Zone 10 for highlight detail, as long as it is only ever intended for scanning, not wet printing, as indicated in my original post.
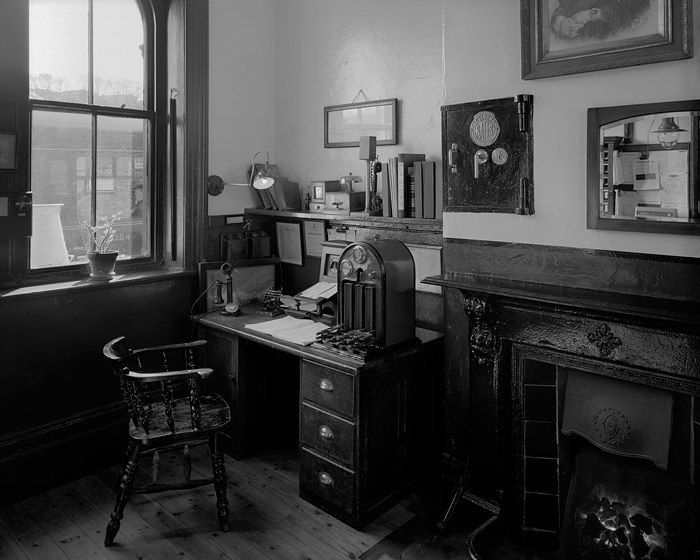
I have worked extensively on achieving negatives that are optimised for scanning ever since Apple and I started a "competition" to see who could produce the best image of the station master's office at Oakworth station. Andrew prints everything in the darkroom and uses the BTZS software to determine the correct exposure and development for wet printing; I use an Epson V700 scanner.
Andrew gave me the negative that he had exposed for the 12-13 stops brightness range that exists from the black of the fire surround to the sky outside the window or the gas mantle in the desk lamp. His negative appeared to be "flat as a fart" (as we say up north
Since the Espon scanner is capable of scanning a much wider range of tones, I embarked on the process of determining the best exposure/development combination to produce a negative that would be better suited to the capabilities of the scanner rather than limiting it to those of a sheet of photographic paper.
After experimentation, and several mistakes
Just as with wet printing, not every negative will print easily but, using these principles of the "JC Zone System" instead of the "AA Zone System", I can achieve results like this :
... or like this :
... bearing in mind that there is a lot more shadow detail on the print than can be realised in a much compressed jpeg file
Last edited by Joanna Carter on Thu Jun 25, 2009 1:31 pm Etc/GMT-1+01:00, edited 1 time in total.
Reassure yourself - stroke an Ebony
-
Joanna Carter
- Founder
- Posts: 1283
- Joined: Wed Mar 29, 2006 7:26 pm Etc/GMT-1+01:00
- Workshop Images: http://grandes-images.com/fr/Paysages/P ... _2009.html
- Location: Plestin-les-Grèves, France
- Contact:
OK, Patrick I have received your negs and, to start with, I think that the first and third negs seem to be OK, but with not as much "bite" as I would personally expect from Acros; this is more than likely down to the developer used. The second neg has a peculiar orangey-brown staining to it which I have never seen before but, I would guess, is an artefact of the problem over the stop and re-fix process.
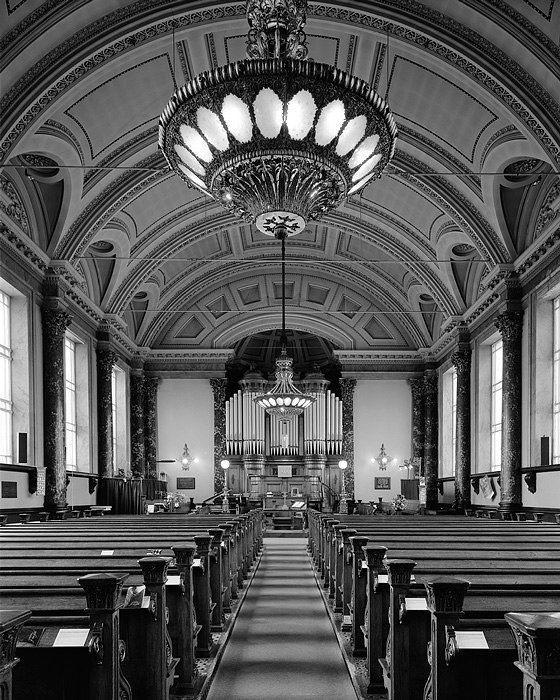
So far, I have only scanned the third neg, as it is the most complete and correct one of the three. Do I guess correctly that this was taken around dusk? If so, an ND grad filter would have helped but, nonetheless, the neg was eminently scannable, but needed quite a bit of work to produce this result :

Unfortunately, if you expect to get a print like this with the software you are using, I would say you are going to be hard pressed; it took me one Levels layer and four Curves layers, three of which were partially masked, to get this result. This kind of work is nothing more than you would expect to do in the darkroom, by dodging and burning and some split-grade work
I have a spare copy of both Photoshop 5 LE and Photoshop Elements 3 which I will send you when I return your negs; I am not sure whether these have all the functionality you may require, but there are many sites that make available plug-ins and effects that can be "retro-fitted" to give you more functionality.
In short, your exposures seem to be acceptable (although, the second neg looks under-exposed) and not beyond the capabilities of a good scanner. Next time you take such a shot, by determining the brightness range of the scene and using either Ansel Adam's or my Zone system to bring the neg to a more easily printable state, you should get even better results.
Whatever you do, don't despair!!! For a beginner, at least you got a recognisable image out of your efforts All you need to do now is to learn how to do the equivalent of the darkroom stuff in Photoshop and you'll be well on your way to fame and fortune

So far, I have only scanned the third neg, as it is the most complete and correct one of the three. Do I guess correctly that this was taken around dusk? If so, an ND grad filter would have helped but, nonetheless, the neg was eminently scannable, but needed quite a bit of work to produce this result :
Unfortunately, if you expect to get a print like this with the software you are using, I would say you are going to be hard pressed; it took me one Levels layer and four Curves layers, three of which were partially masked, to get this result. This kind of work is nothing more than you would expect to do in the darkroom, by dodging and burning and some split-grade work
I have a spare copy of both Photoshop 5 LE and Photoshop Elements 3 which I will send you when I return your negs; I am not sure whether these have all the functionality you may require, but there are many sites that make available plug-ins and effects that can be "retro-fitted" to give you more functionality.
In short, your exposures seem to be acceptable (although, the second neg looks under-exposed) and not beyond the capabilities of a good scanner. Next time you take such a shot, by determining the brightness range of the scene and using either Ansel Adam's or my Zone system to bring the neg to a more easily printable state, you should get even better results.
Whatever you do, don't despair!!! For a beginner, at least you got a recognisable image out of your efforts
Last edited by Joanna Carter on Thu Jun 25, 2009 1:28 pm Etc/GMT-1+01:00, edited 1 time in total.
Reassure yourself - stroke an Ebony
-
Joanna Carter
- Founder
- Posts: 1283
- Joined: Wed Mar 29, 2006 7:26 pm Etc/GMT-1+01:00
- Workshop Images: http://grandes-images.com/fr/Paysages/P ... _2009.html
- Location: Plestin-les-Grèves, France
- Contact:

-
Patrick Dixon
- Forum Hero
- Posts: 252
- Joined: Thu Apr 09, 2009 4:20 pm Etc/GMT-1+01:00
- Location: Yate
Joanna, many thanks for being so generous with your time and expertise - the bad news is that I'm going to send you all my negs from now on
Yes, the three shots were all taken on 14 June at around 20:30 and that one is pointing about 300degs - so a northerly sky.
I didn't have any ND grads at the time - but I do now - although I can't mount them on this lens (Ektar 127mm/F4.7) yet, because it doesn't have a thread and I haven't managed to find the right adapter.
The first two were at f22@1/2s, and that last one was f22@1/5s for variety. I forgot to take my DLSR, so metered using a Weston for the grass, and the sky only seemed a couple of stops brighter on the same meter - so I thought it'd be OK. The one Provia 100F shot (f22@1/2s) I took at the same time blew the sky out completely, and the 1/5s one was on the outside of the DS when I withdrew the DDS from the back of the camera ...
The second neg was under developed compared to the other two, but I didn't agitate the water stop (or use as much water), and I think that resulted in uneven development and contamination of the subsequent fix. But being a beginner I'm not really sure.
I probably should have mentioned that the Acros is 2005 dated, but has been cold stored. Maybe that makes it a little slower than fresh?
So, given that I miscalculated the sky, do you think I'm about OK on the grass and the developing times, or do I need to play around with developing times some more? I've seen from 8 mins to 16 mins for Acros @iso100 and Rodinal 1:50 quoted, so it's left me a bit confused.
I've learned a lot so far, I've gone back and scanned some 120 positives and got much better results than before. I've also had a play with gimp's layers and I think I'm reasonably up to speed on those now. I can even do a bit of 'Ken Lee' toning ...
Thanks again.
-
Joanna Carter
- Founder
- Posts: 1283
- Joined: Wed Mar 29, 2006 7:26 pm Etc/GMT-1+01:00
- Workshop Images: http://grandes-images.com/fr/Paysages/P ... _2009.html
- Location: Plestin-les-Grèves, France
- Contact:
Heheh, if the price is rightPatrick Dixon wrote: - the bad news is that I'm going to send you all my negs from now on
The problem with relying on grass, that late into the evening, is that, from your position, the grass was possibly more side-lit than would yield a Zone 5 reading; thus making the difference between it and the sky greater than two stops. When trying to place zones, it is much easier to use a spot meter, so next time, don't forget the DSLRPatrick Dixon wrote:The first two were at f22@1/2s, and that last one was f22@1/5s for variety. I forgot to take my DLSR, so metered using a Weston for the grass, and the sky only seemed a couple of stops brighter on the same meter
Well, whatever you did, it really left its markPatrick Dixon wrote:The second neg was under developed compared to the other two, but I didn't agitate the water stop (or use as much water), and I think that resulted in uneven development and contamination of the subsequent fix.
I also have outdated Acros and have not noticed any problem at all with speed.Patrick Dixon wrote:I probably should have mentioned that the Acros is 2005 dated, but has been cold stored. Maybe that makes it a little slower than fresh?
Since I don't use Rodinal, I am not the best person to recommend times or dilutions; however, from the appearance of the negs you sent me, I would say that there are definitley better developers to use to get the best out of Acros. The overall "feel" of the negs is "mucky", not as clear as I would have expected using my favourite developer, which is Ilford DD-X; ther is definitely more visible grain than I would expect.Patrick Dixon wrote:So, given that I miscalculated the sky, do you think I'm about OK on the grass and the developing times, or do I need to play around with developing times some more? I've seen from 8 mins to 16 mins for Acros @iso100 and Rodinal 1:50 quoted, so it's left me a bit confused.
Yup, it's all down to learning from mistakesPatrick Dixon wrote:I've learned a lot so far, I've gone back and scanned some 120 positives and got much better results than before. I've also had a play with gimp's layers and I think I'm reasonably up to speed on those now. I can even do a bit of 'Ken Lee' toning ...
Reassure yourself - stroke an Ebony
-
Patrick Dixon
- Forum Hero
- Posts: 252
- Joined: Thu Apr 09, 2009 4:20 pm Etc/GMT-1+01:00
- Location: Yate
-
Alan Clark
- Posts: 53
- Joined: Sat Mar 28, 2009 12:00 pm Etc/GMT-1+01:00
- Location: North Yorkshire
Joanna,
Thank you for your very interesting reply. I bet Andrew loves you! With extreme contrast, such as you describe, extreme measures are called for. But Patrick was just out on a nice sunny day and didn't have such extreme lighting to cope with.
If I had been in his situation I would have been using HP5+ -more forgiving and usefully lower in contrast than Acros . I wuld have rated the film at 200, taken a reading off a grey card that did not have the sun shining on it, and developed the film in ID11 diluted at 1+3 for 15minutes. This very simple well tried and tested method would have produced a negative that would print with no problems in the darkroom and also produce a useful scan in my Epson V700
Alan Clark
-
Joanna Carter
- Founder
- Posts: 1283
- Joined: Wed Mar 29, 2006 7:26 pm Etc/GMT-1+01:00
- Workshop Images: http://grandes-images.com/fr/Paysages/P ... _2009.html
- Location: Plestin-les-Grèves, France
- Contact:
Because the Orbital idea of continuous agitation is nowhere near as aggressive as that which a Jobo processor can inflict on film, I would tend to use the DD-X at a dilution of 1+6 instead of the recommended 1+4 for a time of 8'30" at 20°C. I have learnt to increase the dilution with DD-X rather than reduce the time; this allows you more room for manoeuvre when you need to do N- development.Patrick Dixon wrote:OK, I'll get some DD-X. What dev time(s) would you recommend for an Orbital with continuous agitation/rotation?
It's surprising just how much contrast there can be between shadows and sunlit clouds just before sunset but, without a spot meter, it can be difficult to make an informed choice of exposure.Alan Clark wrote:With extreme contrast, such as you describe, extreme measures are called for. But Patrick was just out on a nice sunny day and didn't have such extreme lighting to cope with.
Actually, Acros is extremely forgiving; it can cope to the point of producing an image when horrendously under-exposed, it only requires half a stop of reciprocity compensation from 2mins up to 1000secs of exposure, it has a latitude that allows recovery from all sorts of exposure mistakes, and it is only contrasty if you process it wronglyAlan Clark wrote:If I had been in his situation I would have been using HP5+ -more forgiving and usefully lower in contrast than Acros.
I would not disagree that you can get a "useful" scan from such a neg, it's just that you can get better results from scanning if you can achieve as full a range (around 9 stops) as possible on the neg. Just don't expect to wet print itAlan Clark wrote:This very simple well tried and tested method would have produced a negative that would print with no problems in the darkroom and also produce a useful scan in my Epson V700
Reassure yourself - stroke an Ebony